
First go at lightpainting with LED torches
I'd read about lightpainting, seen some great examples and thought about using the technique somehow, but it was only recently when I acquired some great LED's that I got stuck in. After studying Dave Black's excellent and 'illuminating" tutorials on light-painting at his "Workshop at the Ranch" series (http://www.daveblackphotography.com/workshop-at-the-ranch) I got in touch with my good friends at Silverpoint Outdoors and begged some LED torches to experiment with. I was fired up with Dave Black's creative lighting and keen to try out some ideas of my own. Stefan at Silverpoint was super-helpful and supplied me with a variety of sample LED flash lights that he thought would be suitable, so at the first opportunity I set up a training shoe shot that I was working with in the scene above.
Using a Nikon D5100, I took DB's advice and went through the camera's menu, making some adjustments. The first settings I used were; manual exposure, 30 seconds @ f8, 400iso, long exposure noise reduction ON, white balance cloudy, auto-focus OFF (after focusing with it), Adobe RGB colour space, picture control to standard - I think that's all I bothered with. I turned out all the room lights in the kitchen where I shot this and tried a blank exposure without any lighting to see what ambient light the camera picked up over 30 seconds. I was surprised. The camera picked up all the ambient tungsten light spilling down the hallway from the lounge and made a horrible orange, noisy, crappy exposure. So I went and turned off all the lounge lights too. The second blank exposure resulted in a completely black frame, which was good.
Now I could add some light. First I tried exposing the scene by "painting" with light with the LED torch I selected, which had a focusing beam to control the light spread - or so I thought. The 30 second exposure at f8 was a total blow-out! I had no idea these LED's were so powerful! The frame was practically white. OK, so I learned that I had to reduce the exposure and the light output. I dialed in 15 seconds @ f22 for exposure and reduced the iso to 100, so that's what, 6 stops less exposure all told. Tried again. Ok, better - now I had a visible frame that looked closer to the mark in terms of exposure but still had highlights blown out all over the place and the lighting was just everywhere. The beam spread from the LED was way too broad.
I made up a little cardboard and gaffer tape snoot to go over the LED to restrict both light output and beam spread. I went for a really severe constricted cone on the snoot, I mean really - the opening was maybe 3 or 4 millimeters, no more. Tried again. Wow! Success. I got pretty much the exposure you see above. And because the beam was so tight, I could really paint the light onto the subject.

My first couple of shots of the training shoe were great experiments in getting the light and exposure fixed (see left) but didn't really address the issue of creative lighting. The light was just splashed around randomly. But the more I experimented, the more I began to understand what I really wanted the shot to look like and how I could achieve that by lighting a little more here, a little less there, and getting highlights and shadows where they looked good.
After just 30 minutes or so of trying stuff out I felt I had a good feel for what was going on and I was more in control. I found I really needed 30 seconds to enable me to move around the subject and think about where and for how long I was painting in the light, so I went for 30 seconds @ f32 on my Nikon DX 18-300 VRII lens and even better, I discovered that the LED I was using (LED Lenser B7 model) had a high and low setting so I could turn the power down a bit for more control. I also used the highlight warning on the camera LCD to check for hot spots on the shoe.
Having achieved a result I was more than happy with for my first time out, I thought about trying for a shot that included the torch in the composition - just for fun.
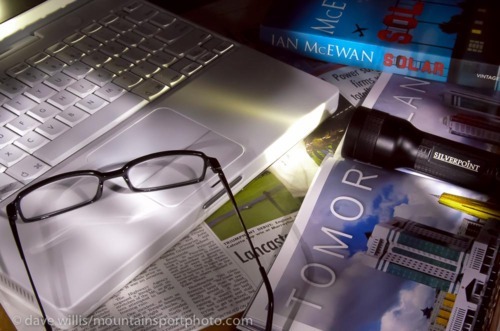
After setting this shot up I placed the Silverpoint LED into the frame and thought about how I could capture the light beam. Clearly I couldn't leave it switched on, the beam would "nuke" the exposure! So I hit on the idea of just pressing the ON button for a split second to get a flash of light and no more, at the start of the 30 second exposure, then continuing to light the scene with my LED Lenser and snoot rig. I had to put the Silverpoint LED into the fold of the magazine (National Geographic actually) so it wouldn't roll around when I handled it and I thought my reading glasses would make some nice shadows and patterns when I put light through them - which sort of worked.
I'm pretty excited about the results I got with just an hours worth of effort so I'm going to continue playing with this and see where it takes me...for truly, I have seen the light!
After just 30 minutes or so of trying stuff out I felt I had a good feel for what was going on and I was more in control. I found I really needed 30 seconds to enable me to move around the subject and think about where and for how long I was painting in the light, so I went for 30 seconds @ f32 on my Nikon DX 18-300 VRII lens and even better, I discovered that the LED I was using (LED Lenser B7 model) had a high and low setting so I could turn the power down a bit for more control. I also used the highlight warning on the camera LCD to check for hot spots on the shoe.
Having achieved a result I was more than happy with for my first time out, I thought about trying for a shot that included the torch in the composition - just for fun.
I'm pretty excited about the results I got with just an hours worth of effort so I'm going to continue playing with this and see where it takes me...for truly, I have seen the light!
No comments:
Post a Comment